Nova postagem

Pesquisar

InterSystems Oficial
· Fev. 19

Alert: SQL Queries Returning Wrong Results

February 19, 2025 – Alert: SQL Queries Returning Wrong Results

InterSystems has corrected two issues that can cause a small number of SQL queries to return incorrect results. In addition, InterSystems has corrected an inconsistency in date/time datatype handling that may lead to different, unexpected – yet correct – results for existing applications that rely on the earlier, inconsistent behavior.

DP-436825: SQL Queries with Lateral Join May Return Wrong Results

The first issue (DP-436825) only affects SQL queries that use a lateral join, either implicitly or explicitly, on an instance configured with non-default per-process memory limit (“bbsiz” parameter in the .cpf file). A clean install of InterSystems IRIS has a default bbsiz of -1 (so there is no memory limit), while an upgrade from an older version would preserve the previous setting. When such a query uses parallelized execution at runtime, including cases where the system uses parallelized execution, the query may return incorrect results. This issue affects versions 2023.3, 2024.1.0, 2024.1.1, 2024.1.2, 2024.2, and 2024.3 of the following products:

  • InterSystems IRIS® data platform
  • InterSystems IRIS® for Health
  • HealthShare® Health Connect

The issue also affects other InterSystems products based on the above products including HealthShare® Unified Care Record and Suite: Version 2024.2 Although the Unified Care Record and suite doesn’t make use of SQL queries that use a lateral join in product code, HealthShare customers who upgrade to HealthShare 2024.2 with a non-default per-process memory limit that also write their own SQL queries that use a lateral join may be affected.  

To avoid the issue, use one of the following three options:

  • Remove the per-process memory limit by setting the bbsiz parameter to -1.
  • Use the %NOPARALLEL keyword in queries that include a lateral join.
  • Temporarily disable Adaptive Mode for the instance, which avoids automatic parallel processing of eligible queries.

These all ensure that the query returns correct results. The correction for this defect is identified as DP-436825 and will be included in all future product releases beginning with 2024.1.3 and 2025.1.0.  It is also available via ad hoc distribution.

DP-436998: SQL queries with reverse sort by %ID entering endless loop

The second issue (DP-436998) impacts SQL queries that order by descending row ID, and in which the row ID is a positive (bitmap-compatible) integer and in particular, data-specific circumstances. Under these conditions, the query may enter an endless loop and keep returning the same set of results until it is aborted. This issue affects versions 2022.2, 2022.3, 2023.x, and 2024.x of the following products:

  • InterSystems IRIS® data platform
  • InterSystems IRIS® for Health
  • HealthShare® Health Connect

It also affects other InterSystems products based on the above products including HealthShare® Unified Care Record and Suite: Version 2024.1 and version 2024.2.  Although the Unified Care Record and suite doesn’t make use of SQL queries with reverse sort by %ID in product code, HealthShare 2024.1 and HealthShare 2024.2 customers that write their own SQL queries with reverse sort by %ID may be affected.   The correction for this defect is identified as DP-436998. It will be included in all future product releases beginning with 2023.1.6, 2024.1.3, and 2025.1.0.  It is also available via ad hoc distribution.

DP-436633: SQL Queries Comparing DATE and TIMESTAMP Values

InterSystems recently corrected an inconsistency in how DATE and TIMESTAMP values are compared using the <=, >, and BETWEEN operators. This correction changes the results of particular date and time comparisons. The updated behavior was introduced in version 2023.3 of:

  • InterSystems IRIS® data platform
  • InterSystems IRIS® for Health
  • HealthShare® Health Connect

It also affects other InterSystems products based on the above products including HealthShare® Unified Care Record and Suite: Version 2024.2.   

It applies to all subsequent releases.

With the updated behavior, DATE values are coerced to a TIMESTAMP value prior to the comparison. This conforms to the SQL standard of coercing the less-precise datatype to the most precise datatype. 

For example, with the new behavior (which is standard-compliant), a query predicate “MyTimeStamp > MyDate” evaluates to FALSE when values for these fields correspond to the same calendar date, except when MyTimestamp corresponds exactly to midnight. Previously, the behavior was only fully standard-compliant when the MyTimeStamp field was defined with %PosixTime format, and returned non-compliant results in certain cases when using %Timestamp or certain combinations of special functions and variables.

To ensure predictable comparisons, InterSystems recommends using explicit CAST functions, especially when using CASE statements or SQL functions such as GETDATE(), NVL() and IFNULL(), where the resulting type may not be obvious.

To help assess which statements are affected by the change in behavior, InterSystems has introduced a warning in the query plan, and an optional system flag to make such statements raise an error at runtime. Enabling the flag can be helpful during regression testing of application code, and can offer an additional safety net for user queries at runtime. This informational feature is identified as DP-436633 and will be included in all future product releases beginning with 2024.1.4 and 2025.1.0.

Further Information

If you experience the impact of this defect, contact the Worldwide Response Center (WRC) for assistance.

Discussão (0)2
Entre ou crie uma conta para continuar
Anúncio
· Fev. 19

[Video] AI model distillation

Hi Community!

We're happy to share the next video in the series dedicated to Gen AI on our InterSystems Developers YouTube:

⏯ AI model distillation

AI model distillation is a technique used to transfer knowledge from large AI models (teacher models) to smaller, more efficient models (student models). Large models, while highly capable, require significant computational resources, making them costly to train and deploy. Smaller models, on the other hand, are faster, cheaper, and more energy-efficient, making them suitable for applications on devices like phones and laptops.

Watch this video to get acquainted with the process of model distillation, which involves running data through both the teacher and student models, comparing their outputs (logits), and using algorithms to adjust the student model to better match the teacher’s responses. This iterative process helps the smaller model approximate the performance of the larger one while maintaining efficiency. Model distillation is widely used in the AI industry, as seen in versions like ChatGPT Turbo, which are distilled from larger models to optimize performance while reducing resource consumption.

🗣  Presenter: @Nicholai Mitchko, Manager of Solution Partner Sales Engineering, InterSystems

Enjoy watching, and look forward to more videos! 👍

Discussão (0)1
Entre ou crie uma conta para continuar
Artigo
· Fev. 19 7min de leitura

ObjectScript Class Explorer - Explorando Classes ObjectScript na Notação UML


Olá!

Este artigo é uma pequena visão geral de uma ferramenta que ajuda a entender classes e sua estrutura dentro dos produtos InterSystems: do IRIS ao Caché, Ensemble e HealthShare.

Em resumo, ela visualiza uma classe ou um pacote inteiro, mostra as relações entre as classes e fornece todas as informações possíveis para desenvolvedores e líderes de equipe sem fazê-los ir ao Studio e examinar o código lá.

Se você está aprendendo os produtos InterSystems, revisando muitos projetos ou apenas interessado em algo novo nas soluções de tecnologia InterSystems - você é mais do que bem-vindo para ler a visão geral do ObjectScript Class Explorer!

Introdução aos Produtos InterSystems

O IRIS (anteriormente conhecido como Caché) é um SGBD( Sistema Gerenciador de Banco de Dados)  multi-modelo. Você pode acessá-lo usando consultas SQL ou interagir com objetos e procedimentos armazenados por meio de interfaces disponíveis para várias linguagens de programação. Mas a primeira opção é sempre desenvolver aplicativos na linguagem nativa e integrada do SGBD - ObjectScript (COS).

O Caché suporta classes no nível do SGBD. Existem dois tipos principais de classes: Persistentes (podem ser armazenadas no banco de dados) e Registradas (não são armazenadas no banco de dados e desempenham o papel de programas e manipuladores). Existem também vários tipos de classes especiais: Serial (classes que podem ser integradas em classes Persistentes para criar tipos de dados complexos, como endereços), DataType (para criar tipos de dados definidos pelo usuário), Index, View e Stream.

Apresentando o Class Explorer

O Caché Class Explorer é uma ferramenta que visualiza a estrutura das classes Caché como um diagrama, mostra as dependências entre as classes e todas as informações relevantes, incluindo o código dos métodos, consultas, blocos xData, comentários, documentação e palavras-chave de vários elementos da classe.

Funcionalidade

O Class Explorer usa uma versão estendida da notação UML para visualização, já que o Caché possui um conjunto adicional de entidades que não são suportadas no UML padrão, mas são importantes para o Caché: consultas, blocos xData, muitas palavras-chave para métodos e propriedades (como System, ZenMethod, Hidden, ProcedureBlock e outros), relações pai-filho e um-para-muitos, tipos de classe e assim por diante. 

O Caché Class Explorer (versão 1.14.3) permite que você faça o seguinte:

  • Exiba a hierarquia de pacotes, um diagrama de classes ou um pacote inteiro;
  • Edite a aparência de um diagrama depois que ele for exibido;
  • Salve a imagem atual de um diagrama de classes;
  • Salve a aparência atual de um diagrama e restaure-a no futuro;
  • Pesquise por quaisquer palavras-chave mostradas em um diagrama ou em uma árvore de classes;
  • Use dicas de ferramentas (tooltips) para obter informações completas sobre classes, suas propriedades, métodos, parâmetros, consultas e blocos xData;
  • Visualize o código de métodos, consultas ou blocos xData;
  • Habilite ou desabilite a exibição de quaisquer elementos do diagrama, incluindo ícones gráficos. 

Para melhor compreensão de tudo o que se segue neste artigo, veja como as classes são visualizadas no Class Explorer. Como exemplo, vamos exibir o pacote "Cinema" do namespace "SAMPLES":

    Visão geral de detalhes e recursos

    A barra lateral esquerda contém uma árvore de pacotes. Posicione o cursor sobre o nome do pacote e clique em um botão que aparece à sua direita para exibir o pacote inteiro. Selecione a classe na árvore de pacotes para renderizá-la juntamente com suas classes vinculadas.

    O Class Explorer pode exibir vários tipos de dependências entre classes:

    1. Herança: É mostrada com uma seta preenchida com cor branca apontando na direção da classe herdada;
    2. "Associação" ou relação entre classes: Se um campo de uma das classes contiver um tipo de outra classe, o construtor de diagramas mostrará isso como uma relação de associação;
    3. Relação Pai-Filho e Um-Para-Muitos: As regras de manutenção da integridade dos dados.

    Se você apontar o cursor sobre a relação, as propriedades que criam essa relação serão destacadas:

    Deve-se notar que o Class Explorer não se aprofundará e não desenhará dependências para classes fora do pacote atual. Ele mostrará apenas as classes no pacote atual e, se você precisar limitar a profundidade com que o Class Explorer deve procurar as classes, use a configuração "Nível de dependência":

    A própria classe é exibida como um retângulo dividido em seis seções:

    1. Nome da classe: Se você apontar o cursor para o nome da classe, poderá saber quando ela foi criada e modificada, visualizar o comentário e todas as palavras-chave atribuídas à classe. Um clique duplo no cabeçalho da classe abrirá sua documentação;
    2. Parâmetros da classe: Todos os parâmetros atribuídos com tipos, palavras-chave e comentários. Parâmetros em itálico, assim como quaisquer propriedades, possuem dicas de ferramentas e podem ser focalizados (hover);
    3. Propriedades da classe: São semelhantes aos parâmetros;
    4. Métodos: Qualquer método pode ser clicado para visualizar seu código-fonte. A sintaxe COS será destacada;
    5. Consultas (Queries): São como métodos - clique neles para visualizar o código-fonte;
    6. Blocos xData: Blocos que contêm principalmente dados XML. Clicar neles mostrará o código-fonte formatado no bloco.

    Por padrão, cada classe é exibida com um número de ícones gráficos. O significado de cada ícone pode ser esclarecido clicando no botão Ajuda no canto superior direito da tela. Se você precisar de uma notação UML mais ou menos estrita que é exibida por padrão, bem como a exibição de quaisquer seções de classe, isso pode ser desativado na seção de configurações.

    Se um diagrama for muito grande e desconhecido para você, você pode usar uma função de pesquisa rápida de diagrama. A classe contendo qualquer parte da palavra-chave que você inseriu será destacada. Para pular para a próxima correspondência, basta pressionar Enter ou clicar no botão de pesquisa novamente:

    Finalmente, depois que todas as edições no diagrama forem feitas, todas as relações desnecessárias forem removidas e os elementos forem colocados em suas posições para atingir a aparência desejada, você pode salvá-lo clicando no botão Download no canto inferior esquerdo: 

    Quando você ativa um botão de alfinete (pin) 
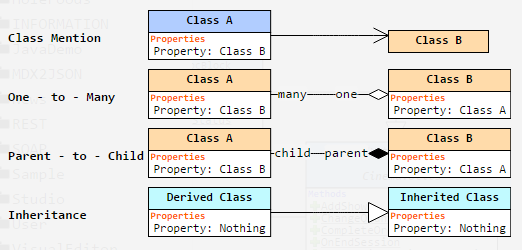
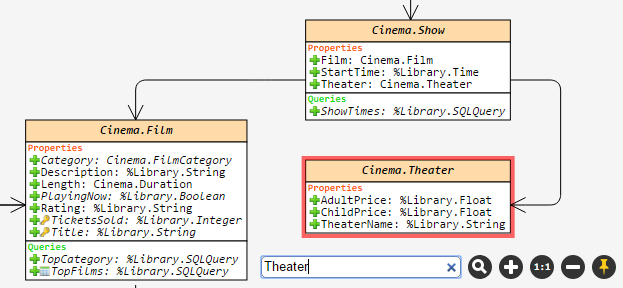
, a posição dos elementos no diagrama do conjunto atual de classes (ou um pacote) será salva. Por exemplo, se você selecionar as classes A e B e, em seguida, salvar a visualização com o botão de alfinete, você verá exatamente a mesma visualização ao escolher as classes A e B novamente, mesmo após reiniciar o navegador ou a máquina. Mas se você escolher apenas a classe A, o layout será o padrão.

    Instalação

    Para instalar o Caché Class Explorer, você só precisará importar o pacote xml da versão mais recente  para qualquer namespace. Assim que a importação for concluída, você poderá notar que o novo aplicativo web chamado hostname/ClassExplorer/ (a barra no final é obrigatória) apareceu.

    Instruções de instalação detalhadas

    1. Baixe o arquivo com a versão mais recente do Caché Class Explorer;
    2. Extraia o arquivo XML chamado Cache/CacheClassExplorer-vX.X.X.xml;
    3. Importe o pacote para qualquer namespace usando uma das seguintes maneiras:
      1. Basta arrastar o arquivo XML para o Studio;
      2. Usando o Portal de Gerenciamento do Sistema: Explorador de Sistema -> Classes -> Importar e especifique o caminho para o arquivo local;
      3. Usando o comando do terminal: do ##class(%Installer.Installer).InstallFromCommandLine(“Path/Installer.cls.xml”);
    4. Leia o log de importação — se tudo estiver OK, você poderá abrir o aplicativo web em http://hostname/ClassExplorer/. Se algo der errado, verifique o seguinte:
      1. Se você tem direitos suficientes para importar classes para este namespace;
      2. Se o usuário do aplicativo web tem privilégios suficientes para acessar diferentes namespaces;
      3. Se você receber o erro 404, basta verificar se adicionou uma barra no final da URL.

    Algumas outras capturas de tela.

    [Captura de tela 1] Pacote DSVRDemo, passando o mouse sobre o nome de uma classe.

    [Captura de tela 2] Pacote DataMining, pesquisando pela palavra-chave "TreeInput" no diagrama.

    [Captura de tela 3] Visualização do código do método na classe JavaDemo.JavaListSample.

    [Captura de tela 4] Visualizando o conteúdo do bloco XData na classe ClassExplorer.Router.

    Você pode experimentar como o Class Explorer funciona no namespace padrão SAMPLES:  demo. . E aqui está uma resenha em vídeo do projeto.

    Quaisquer comentários, sugestões e observações são bem-vindos - por favor, deixe-os aqui ou no repositório do GitHub. Aproveite!

    Discussão (0)1
    Entre ou crie uma conta para continuar
    Artigo
    · Fev. 19 3min de leitura

    Importer un objet JSON avec une grande string

    Pour l'un de nos clients, j'ai dû intégrer le point de terminaison AFAS imageconnector /imageconnector/{imageId}?format={format}.
    Ce point de terminaison renvoie un message json avec l'image comme propriété de chaîne codée en base64, en plus du type MIME de l'image :

    Discussão (0)1
    Entre ou crie uma conta para continuar
    Artigo
    · Fev. 19 4min de leitura

    Keeping IRISTEMP Under Control: Stop It from Taking Over Your Storage!


    So, you checked your server and saw that IRISTEMP is growing too much. There's no need to panic. Let’s investigate the issue before your storage runs out.

    Step 1: Confirm the IRISTEMP Growth Issue

    Before assuming IRISTEMP is the problem, let’s check its actual size.

    Check the Free Space

    Run the following command in the IRIS terminal:

    %SYS>do ^%FREECNT

    When prompted, enter:

    Database directory to show free space for (*=All)? /<your_iris_directory>/mgr/iristemp/

    If the output shows very low free space, IRISTEMP is filling up your storage like an overstuffed closet. But if the free space is fine, yet the IRISTEMP database file (IRIS.DAT) is still massive (which is probably why you're here), it means the temporary data has already been cleaned up. In that case, your mission is to keep an eye on things, follow the steps below to catch it in the act next time, and recover that precious space. 

    Step 2: Identify What is Using IRISTEMP

    Run ^%GSIZE to Find Large Globals

    %SYS>do ^%GSIZE

    Follow the prompts:

    Directory name: /<your_iris_dir>/mgr/iristemp/
    
    All Globals? No => yes
    
    33 items selected from
    33 available globals
    
    1) Get exact packing details
    2) Get block counts only
    3) Use fast stochastic estimate
    
    Please select an option:  3 => 3

    Example output:

            Global              Blocks          Bytes Used Packing
          ----------- ---------------- ------------------- -------
          IRIS.Temp.Ensemble
                                    1                  60      1 %
          IRIS.Temp.MARIO
                                   50             360,960     88 %
          IRIS.Temp.RecompileInfo
                                    1                  84      1 %

    If you see something unfamiliar, especially related to ISC or SQL, it could be SQL queries using too much space. Check with the application developers to see what these queries are doing and whether they can be optimized. Sometimes, adding an index or removing an unnecessary ORDER BY clause can make a big difference. 

    Step 3: Check Process-Private Globals (PPGs)

    Process-Private Globals (PPGs) may not be released properly by some processes. Run:

    %SYS>DO ^GETPPGINFO

    Example output:

    %SYS> DO ^GETPPGINFO("*")
    Process ID: 303 --> Total PPG Block count 10840
      ^||%t uses 10838 blocks (maxblock #1926355)
      ^||TempQuery uses 2 blocks (maxblock #115489)
      Highest block #: 1926355
    Process ID: 33456 --> Total PPG Block count 45343
      ^||MARIOtest uses 45343 blocks (maxblock #1927313)
      Highest block #: 1927313

    If a process is using a lot of PPG space, it might be stuck or not working as expected. You should investigate with the application developers to find if the PPGs are known and there is something broken in the code. The same, if the PPG is not known at old and looks like InterSystems internal code (for example ^||%t) is better you open a WRC support case asking for help. 

    Become an expert in GETPPGINFO by reading the official documentation.

    Step 4: Fix the Problem

    Option 1: Stop the Process 

    Once you have identify the process consuming the IRISTEMP, if you know what is doing and consider it safe, you can use either the System Management Portal or the terminal for killing it. From the terminal, you can find the job and terminate it:

    %SYS>do ^JOBEXAM

    Find the job number and run:

    %SYS>DO ^RESJOB
     
    Force a process to quit InterSystems IRIS
     
    Process ID (? for status report): 7732
    
    Process ID (? for status report):
     
    %SYS>

    ⚠️ Only stop a process if you know it and you are sure it is safe to do so!

    Option 2: Restart IRISTEMP and Set Limits

    To clear IRISTEMP, stop Iris, remove its IRIS.DAT file and restart:

    iris stop <instance_name>
    rm /<iris_directory>/mgr/iristemp/IRIS.DAT
    iris start <instance_name>

    To reset IRISTEMP at startup and return space to the OS, set a limit in your IRIS configuration with:

    [Startup]
    MaxIRISTempSizeAtStart=5000

    See the official documentation on  MaxIRISTempSizeAtStart for more details. Without this, IRISTemp will empty but keep its bloated size! For better control, consider relocating IRISTEMP to a dedicated volume or setting a max DB size in SMP. Also, there are other articles with more details in the community: How to Shrink IRISTEMP 

    Option 3: Old version? Upgrade!

    If you are running an old Iris version, upgrade! For example, I do remember we fixed a bug in 2021.1.1+ where the IrisTemp could grow uncontrollably. Upgrading and being on the latest maintenance releases is the best way to be hit by known bugs.

    Conclusion: Keep IRISTEMP Under Control

    By following these steps, you can:

    ✅ Find what is using IRISTEMP with ^%GSIZE and ^GETPPGINFO
    ✅ Stop known processes that hold too much PPG space
    ✅ Recover the space by setting limits or recreating the IrisTemp database.

    Upgrade! This is always recommended! 

    By doing this, you can keep IRISTEMP under control and avoid storage issues. 🚀

    3 Comments
    Discussão (3)1
    Entre ou crie uma conta para continuar