 Open Exchange
本文第一部分提供了所有背景信息。其中还包括DATATYPE_SAMPLE数据库的链接,您可以使用该链接来跟进示例。
在该部分中,我们探讨了一种易于检测的错误类型(""Access Failure【访问失败】") ,因为当尝试通过数据库驱动程序读取数据时,它会立即触发一条明确的错误消息。
本节讨论的错误更为隐蔽,也更难发现。我将它们称为"静默损坏(Silent Corruption)"和"未检测到的数据变异(Undetected Mutation)"。
让我们从"静默损坏(Silent Corruption)"开始:
在DATATYPE_SAMPLE数据库的 "雇员(Employee) "表中,有一条被故意篡改的记录可以证明这种行为--它就是ID = 110 的记录。 乍一看,甚至再看一眼,都看不出任何问题。无论是数据库驱动程序还是查询工具,都没有显示读取该记录有问题。
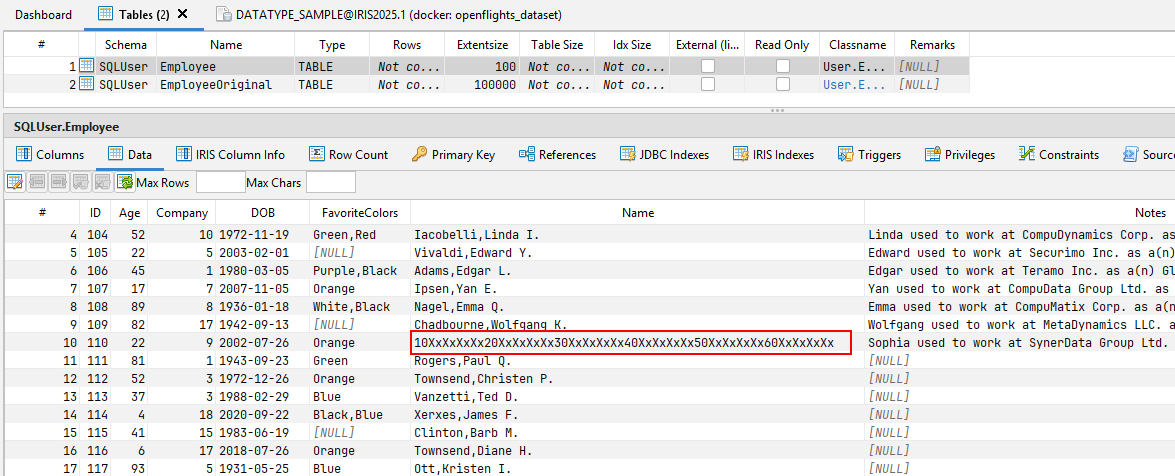
只有仔细观察才会发现,红色标记单元格中的值与传输(和定义)的元数据不符。
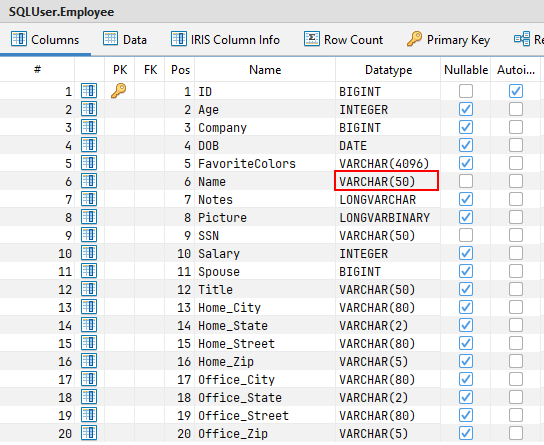
"名称(Name)"列被定义为VARCHAR(50),但实际值为60 个字符!
在某些情况下,这种行为不会造成任何问题——例如,当驱动程序宽松地处理这种不一致时。
但是,当下游系统依赖于所提供的元数据时,问题就会出现。如果根据这些元数据定义进行进一步处理,当实际内容与约定的接口不一致时,就可能出现错误。一个典型的例子是 ETL 工具,它通常根据元数据生成目标表或定义转换。
以下 SQL 查询可用于识别内容偏离已定义元数据的记录:
SELECT
 Name,
 CASE WHEN LENGTH(Name) > 50 THEN 1 ELSE 0 END AS Name_LENGTH_CHECK
,SSN,
 CASE WHEN LENGTH(SSN) > 50 THEN 1 ELSE 0 END AS SSN_LENGTH_CHECK
FROM SQLUser.Employee
WHERE
      LENGTH(Name) > 50
OR    LENGTH(SSN) > 50
执行此查询后,只会返回包含错误的记录。在每一行中,如果值超过元数据定义的长度,有问题的单元格将被标记为 1。
现在我们来看看下一种错误类型:"未检测到的数据变异(Undetected Mutation)"。
为了演示这个问题,DATATYPE_SAMPLE数据库中包含了一条专门为说明这种行为而更改的错误记录。
问题记录是ID = 120的记录
同样,在读取这条记录时,数据库驱动程序和查询工具都不会显示问题。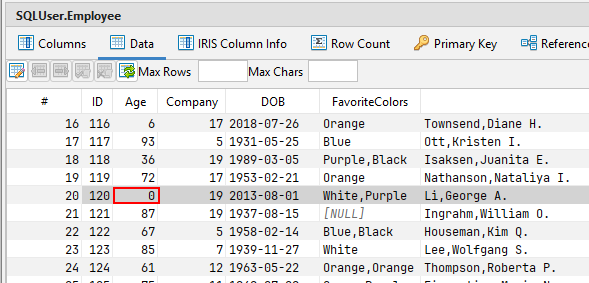
在这种情况下,该值甚至看起来与元数据相匹配!该列定义为INTEGER,该行在该单元格中返回一个整数值(在本例中为:0)。
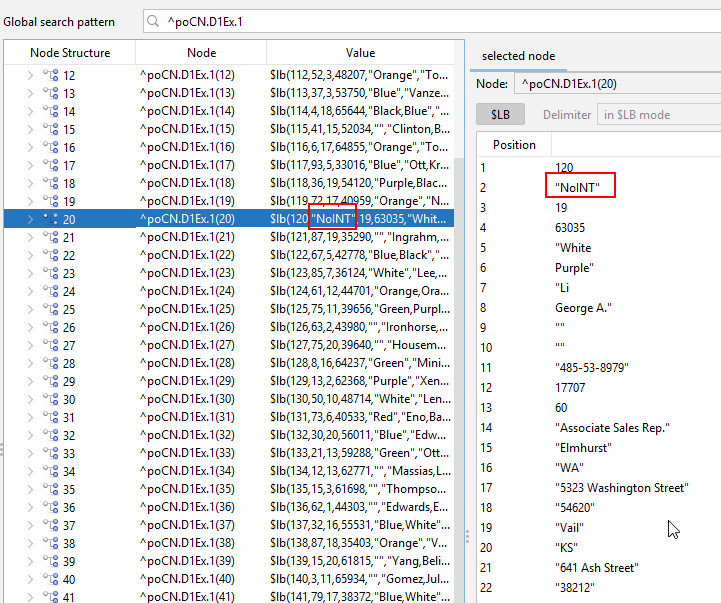
然而,这个值实际上并没有存储在数据库中!通过操作,一个字符串(STRING)值被注入到这个字段中。
SELECT
 CAST(Age AS VARCHAR(255)) AS Age,
 ISNUMERIC(CAST(Age AS VARCHAR(255))) AS Age_ISNUMERIC
FROM SQLUser.Employee
WHERE
    ISNUMERIC(CAST(Age AS VARCHAR(255))) = 0
如果执行此查询,只会返回包含元数据不一致的行。在每个结果行中,如果值无法被驱动程序解释为数值,则有问题的单元格会被标记为 0。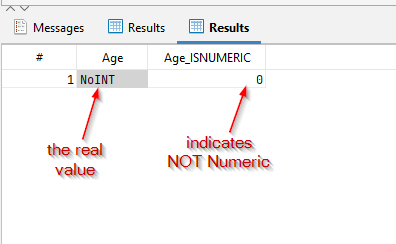
最后的思考
这些情况凸显了看似格式良好的数据如何隐藏着微妙的不一致性——尤其是在绕过标准保障措施的遗留系统中。虽然 "访问失败(Access Failures) "很容易被发现,但"静默损坏(Silent Corruption)"和"未检测到的数据变异(Undetected Mutation)"等问题往往会被忽略,却会给下游带来严重问题,尤其是在依赖严格元数据合规性的系统中。
这里分享的DATATYPE_SAMPLE数据库和诊断查询为手动识别此类问题奠定了基础。但是面对现实,手工编写这些检查既繁琐又容易出错。
幸运的是,SQL DATA LENS(最低版本 3.22)使这一过程变得更加简单。 😉 只需单击一下,它就能为表、视图和存储过程(Tables, Views, and Stored Procedures)生成全面的完整性检查,从而节省时间并帮助您提前发现隐藏的数据质量问题。