Nova postagem

Encontrar

Artigo
· jan 6 8min de leitura

Introduction à l'interopérabilité sur Python (IoP) - Partie 1

Interoperability on Python (IoP) (Interopérabilité sur Python) est un projet de validation de concept conçu pour démontrer la puissance du cadre d'interopérabilité InterSystems IRIS lorsqu'il est associé à une approche axée sur Python. IoP exploite Embedded Python (une fonctionnalité d'InterSystems IRIS) pour permettre aux développeurs d'écrire des composants d'interopérabilité en Python, qui s'intègrent de manière transparente à la plateforme IRIS robuste. Ce guide a été conçu pour les débutants et fournit une introduction complète à l'IoP, à sa configuration et aux étapes pratiques pour créer votre premier composant d'interopérabilité. À la fin de cet article, vous comprendrez clairement comment utiliser l'IoP pour créer des solutions d'interopérabilité évolutives basées sur Python. IoP est particulièrement utile pour les développeurs qui travaillent avec InterSystems IRIS ou IRIS for Health, car il simplifie la création de services métier, de processus métier et d'opérations métier qui utilisent Python. Une telle approche réduit la dépendance à ObjectScript (le langage traditionnel pour le développement IRIS), le rendant plus accessible aux développeurs Python.


Pourquoi utilisons-nous IoP?

IoP offre plusieurs avantages aux développeurs:

  1. Dévelopment Python-First: Python est un langage largement adopté, convivial pour les débutants et doté d'un riche écosystème de bibliothèques. IoP permet aux développeurs de tirer parti de leur expertise Python au sein de l'écosystème IRIS.
  2. Interopérabilité simplifiée: IoP résume les configurations complexes basées sur ObjectScript, permettant un développement plus rapide des composants d'interopérabilité.
  3. Applications de santé Healthcare: IoP est particulièrement adapté aux intégrations dans le domaine de la santé, telles que celles impliquant FHIR (Fast Healthcare Interoperability Resources), grâce à la prise en charge robuste des normes de santé par IRIS for Health.
  4. Communauté et Open Source: IoP est disponible sur PyPI et GitHub et bénéficie d'un soutien actif de la communauté, notamment grâce aux contributions de développeurs tels que Guillaume Rongier (développeur évangéliste pour InterSystems).

Conditions préalables

Avant de vous lancer dans IoP, assurez-vous d'avoir les éléments suivants:

  • InterSystems IRIS ou IRIS for Health: une installation locale ou un conteneur Docker exécutant IRIS (la version Community Edition suffit pour les tests).
  • Python 3.10 ou version ultérieure: requis pour exécuter IoP et ses dépendances.
  • Connaissances de base en Python: bonne connaissance des classes, des fonctions et de l'installation des paquets Python.

Dans ce tutoriel, nous utiliserons à l'aide d'une installation IRIS locale pour créer une production InterSystems IRIS comportant une fonctionnalité basée sur Python qui enregistre un message 'Hello World' à la réception d'une requête. Cela devrait démontrer une intégration transparente avec le cadre d'interopérabilité IRIS.

Les étapes suivantes décrivent le processus permettant d'atteindre cet objectif :

  • Étape 1: configuration de l'environnement virtuel
  • Étape 2: installation du paquet IoP
  • Étape 3: configuration des variables d'environnement pour la connexion IRIS
  • Étape 4: initialisation du module IoP dans IRIS à l'aide de l'interface de ligne de commande (CLI)
  • Étape 5: création d'une opération métier Python: exemple Hello World
  • Étape 6: migration des composants IoP vers IRIS
  • Étape 7: aperçu de la production
  • Étape 8: Test du composant d'opération de production


Commençons par l'étape 1.

Étape1: configuration de l'environnement virtuel

Tout d'abord, configurez un environnement virtuel Python afin d'isoler les dépendances de votre projet et d'assurer la compatibilité avec IoP et InterSystems IRIS. Un environnement virtuel est un répertoire autonome contenant une version spécifique de Python et les packages requis pour votre projet. Une telle configuration évite les conflits avec d'autres projets Python et rationalise le processus de développement. Pour ce tutoriel, créez un dossier nommé IOP afin d'organiser vos fichiers de projets.

Accédez au dossier IOP et exécutez la commande suivante pour configurer l'environnement virtuel:

python -m venv .venv

Cette commande crée un répertoire .venv dans votre dossier IOP, contenant un interpréteur Python et tous les paquets que vous installez pour votre projet IoP.

Pour activer l'environnement virtuel sous Windows, exécutez la commande suivante:

.venv\Scripts\activate


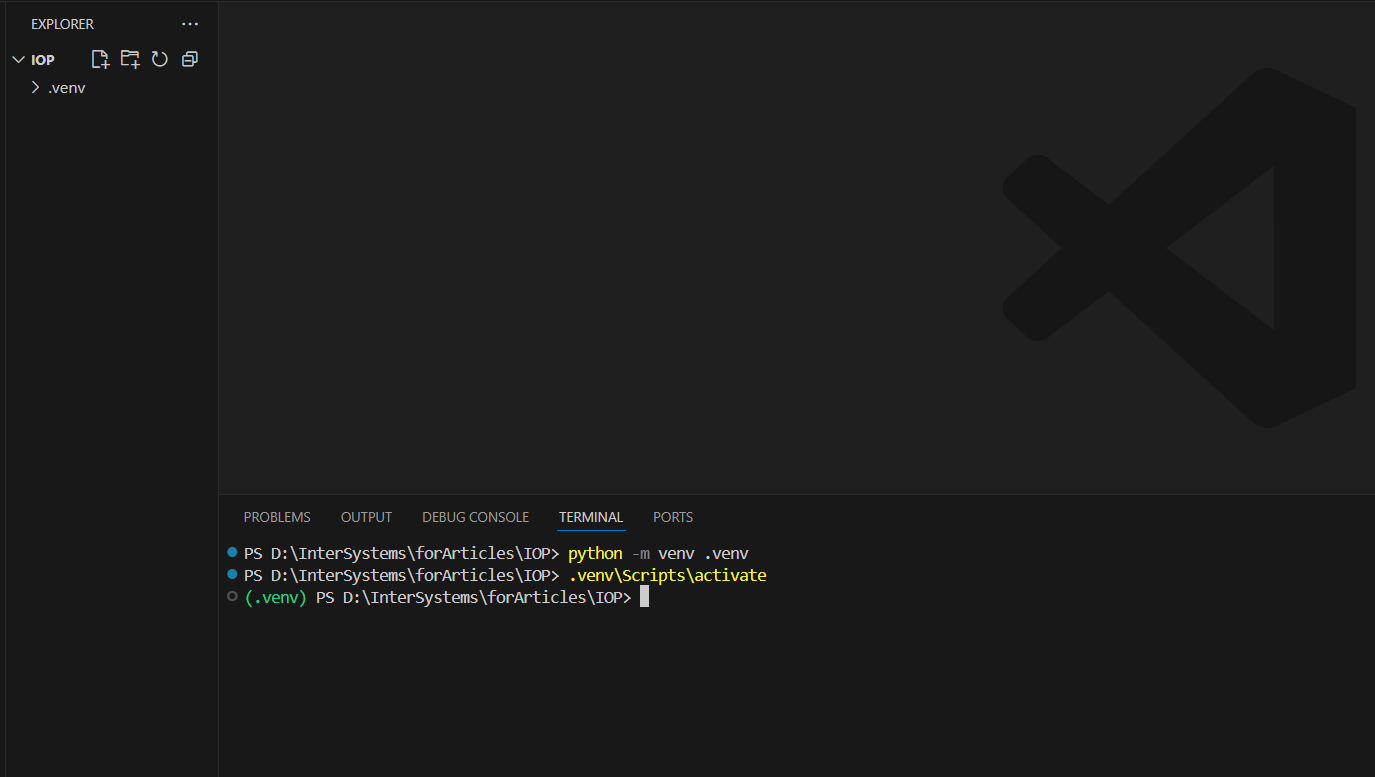
Pour Unix ou MacOS, utilisez la commande suivante:

source .venv/bin/activate


Étape 2: installation du paquet IoP

Une fois votre environnement virtuel activé, installez le paquet iris-pex-embedded-python, dépendance principale de votre projet IoP, afin d'activer l'interopérabilité basée sur Python au moyen d'InterSystems IRIS. Exécutez la commande suivante dans votre terminal:

pip install iris-pex-embedded-python

Cette commande installe le paquet iris-pex-embedded-python et ses dépendances à partir du Python Package Index (PyPI) dans votre environnement virtuel. Après l'installation, vous pouvez utiliser le module IoP à l'aide de composants d'interopérabilité basés sur Python, tels que les activités commerciales pour votre projet IoP.


Discussão (0)1
Entre ou crie uma conta para continuar
Artigo
· jan 5 1min de leitura

クロスプラットフォームで開発する際のちょっとした落とし穴

MacOS(Linux)とWindows両方で動作するObjectScriptプログラムを開発する際に、よくやらかしてしまうミスを共有します。

WindowsとUNIX系のファイルシステムの1つの違いは、ディレクトリのセパレータです。

UNIX系は、/(スラッシュ)

Windows系は、\(バックスラッシュ)

です。

ファイルを読み書きするプログラムでセパレータをOS別に選択するという以下のようなコードをよく書くのですが、

if ($system.Version.GetOS() = "UNIX") {
    set sep = "/"
}
else {
    set sep = "\"
}


ここでこのバックスラッシュをキーボードで入力すると、日本語キーボードの場合、バックスラッシュの代わりに¥(円マーク)が入力されてしまいます。

ソースコードがSJISの場合は、これでも問題ないのですが、クロスプラットフォームで開発する場合は、UTF8で通常作成するので、Macで動かすと問題ないのにWindowsで動かすとエラーになるということがちょくちょく起こります。

そして、これは意外に間違いに気づきにくいです。

ちなみにPythonでは、どちらでも/を使っておけば問題ないので、こんな問題は起こることはないと思います。

3 Comments
Discussão (3)1
Entre ou crie uma conta para continuar
Artigo
· jan 5 4min de leitura

Generating JWT without access to system x509 cert/keys

If you want to generate JWT from x509 cert/key, any operation (including reading) on %SYS.X509Credentials requires U on %Admin_Secure resource.%Admin_Secure is required because %SYS.X509Credentials is persistent, and it's implemented this way to prevent all users from accessing private keys.

If %Admin_Secure resource is not available at runtime, you can use the following workaround.

Upon reviewing the code for JWT generation, I discovered that the JWT code utilizes %SYS.X509Credentials solely as a source of runtime data for PrivateKey, PrivateKeyPassword, and Certificate. As a workaround, you can use a runtime non-persistent implementation of the X.509 interface, exposing just these properties. If you're using interoperability Cert/PK can be stored in credentials for secure access:

Class User.X509 Extends %RegisteredObject
{

Property PrivateKey As %VarString;
Property PrivateKeyPassword As %String;
Property Certificate As %VarString;
Property HasPrivateKey As %Boolean [ InitialExpression = {$$$YES} ];
ClassMethod GetX509() As User.X509
{
    set x509 = ..%New()
    set x509.PrivateKey = ..Key()
    set x509.Certificate = ..Cert()
    quit x509
}

/// Get X509 object from credential.
/// Username is a Cert, Password is a Private Key
ClassMethod GetX509FromCredential(credential) As User.X509
{
    set credentialObj = ##class(Ens.Config.Credentials).%OpenId(credential,,.sc)
    throw:$$$ISERR(sc) ##class(%Exception.StatusException).ThrowIfInterrupt(sc)
    
    // If a credential is entered via SMP UI it has been stripped of new-lines (replaced with whitespaces)
    // If we can't find EOL in cert/key we replace whitespaces with new lines
    // set eol = $C(13,10)
    set eol = $c(10)
    
    set key = credentialObj.Password 
    if '$find(key, eol) {
        set key = $Replace(key, " ", eol)
        set key = $Replace(key, "-----BEGIN"_eol_"RSA"_eol_"PRIVATE"_eol_"KEY-----", "-----BEGIN RSA PRIVATE KEY-----")
        set key = $Replace(key, "-----END"_eol_"RSA"_eol_"PRIVATE"_eol_"KEY-----", "-----END RSA PRIVATE KEY-----")
    }
    
    set cert = credentialObj.Username
    if '$find(cert, eol) {
        set cert = $Replace(cert, " ", eol)
        set cert = $Replace(cert, "-----BEGIN"_eol_"CERTIFICATE-----", "-----BEGIN CERTIFICATE-----")
        set cert = $Replace(cert, "-----END"_eol_"CERTIFICATE-----", "-----END CERTIFICATE-----")
    }
    
    set x509 = ..%New()
    set x509.PrivateKey = key
    set x509.Certificate = cert
    quit x509
}

ClassMethod Key()
{
    q "-----BEGIN RSA PRIVATE KEY-----"_$C(13,10)
    _"YOUR_TEST_KEY"_$C(13,10)
    _"-----END RSA PRIVATE KEY-----"
}

ClassMethod Cert() As %VarString
{
    q "-----BEGIN CERTIFICATE-----"_$C(13,10)
    _"YOUR_TEST_CERT"_$C(13,10)
    _"-----END CERTIFICATE-----"
}

}

And you can generate JWT the following way:

ClassMethod JWT() As %Status
{
    Set sc = $$$OK
    //Set x509 = ##class(%SYS.X509Credentials).GetByAlias("TempKeyPair")
    Set x509 = ##class(User.X509).GetX509()
    
    Set algorithm ="RS256"
    Set header = {"alg": (algorithm), "typ": "JWT"}
    Set claims= {"Key": "Value" }
    
    #; create JWK
    Set sc = ##class(%Net.JSON.JWK).CreateX509(algorithm,x509,.privateJWK)
    
    If $$$ISERR(sc) {
        Write $SYSTEM.OBJ.DisplayError(sc)
    }

    #; Create JWKS
    Set sc = ##class(%Net.JSON.JWKS).PutJWK(privateJWK,.privateJWKS)
    
    If $$$ISERR(sc) {
        Write $SYSTEM.OBJ.DisplayError(sc)
    }

    Set sc = ##Class(%Net.JSON.JWT).Create(header,,claims,privateJWKS,,.pJWT)
    
    If $$$ISERR(sc) {
        Write $SYSTEM.OBJ.DisplayError(sc)
    }
    
    Write pJWT
	Return sc
}

Alternatively you can use dynamic object to skip class creation, in that case it would look like this:

ClassMethod JWT(credential) As %Status
{
    Set sc = $$$OK
    //Set x509 = ##class(%SYS.X509Credentials).GetByAlias("TempKeyPair")
    Set credentialObj = ##class(Ens.Config.Credentials).%OpenId(credential,,.sc)
    throw:$$$ISERR(sc) ##class(%Exception.StatusException).ThrowIfInterrupt(sc)
    
    Set x509 = {
        "HasPrivateKey": true,
        "PrivateKey": (credentialObj.Password),
        "PrivateKeyPassword":"",
        "Certificate":(credentialObj.Username)
    }

    Set algorithm ="RS256"
    Set header = {"alg": (algorithm), "typ": "JWT"}
    Set claims= {"Key": "Value" }
    
    #; create JWK
    Set sc = ##class(%Net.JSON.JWK).CreateX509(algorithm,x509,.privateJWK)
    
    If $$$ISERR(sc) {
        Write $SYSTEM.OBJ.DisplayError(sc)
    }

    #; Create JWKS
    Set sc = ##class(%Net.JSON.JWKS).PutJWK(privateJWK,.privateJWKS)
    
    If $$$ISERR(sc) {
        Write $SYSTEM.OBJ.DisplayError(sc)
    }

    Set sc = ##Class(%Net.JSON.JWT).Create(header,,claims,privateJWKS,,.pJWT)
    
    If $$$ISERR(sc) {
        Write $SYSTEM.OBJ.DisplayError(sc)
    }
    
    Write pJWT
    Return sc
}
1 Comment
Discussão (1)2
Entre ou crie uma conta para continuar
Artigo
· jan 5 1min de leitura

Como obter informações do servidor/instância

Olá a todos,

Como parte do desenvolvimento de uma API para saber a qual instância do IRIS está conectada, encontrei alguns métodos para obter informações sobre o servidor que podem ser úteis.

Obter o nome do servidor: $SYSTEM.INetInfo.LocalHostName()

Obter o IP do servidor: $SYSTEM.INetInfo.HostNameToAddr($SYSTEM.INetInfo.LocalHostName())

Obter o nome da instância: $PIECE($SYSTEM,":",2)

Assim, criei o seguinte código como uma classe BS:

Class St.Common.Api Extends (%CSP.REST, Ens.BusinessService)
{
{

XData UrlMap [ XMLNamespace = "http://www.intersystems.com/urlmap" ]
{
<Routes>
	<Route Url="/check" Method="GET" Call="Check"/>
</Routes>
}

ClassMethod Check() As %Status
{
	set serverInfo = {}
	set serverInfo.ServerName = $SYSTEM.INetInfo.LocalHostName()
	set serverInfo.ServerIP = $SYSTEM.INetInfo.HostNameToAddr($SYSTEM.INetInfo.LocalHostName())
	set serverInfo.Instance = $PIECE($SYSTEM,":",2)
	
	write serverInfo.%ToJSON()
	quit $$$OK
}
}

Chamando o método:

localhost:52773/common/api/check

{
  "ServerName": "LAPTOP-KURRO-3",
  "ServerIP": "11.52.197.99",
  "Instance": "HEALTHCONNECT"
}

Espero que seja tão útil para você quanto foi para mim.

Atenciosamente.

Discussão (0)1
Entre ou crie uma conta para continuar
Anúncio
· jan 5

InterSystems Change Control: Tier 1 Basics – Virtual January 21-23, 2026 / Registration space available

InterSystems Change Control: Tier 1 Basics - Virtual January 21-23, 2026

  • This 3-day course is only for current users of the Change Control Record (CCR) application. 
  • Use InterSystems Change Control Record (CCR) to progress code changes and debug problems.
  • CCR users will learn how to safely progress changes to code and interfaces as well as troubleshoot common issues. 
  • The CCR application is primarily used by customers hosted or implemented by InterSystems. 
  • General use of Source Control with InterSystems products is not covered. 
  • This course is applicable to all developers and interface specialists using CCR and will not cover Tier 2 usage for InterSystems TrakCare® application specialists.


SELF REGISTER HERE

Discussão (0)1
Entre ou crie uma conta para continuar