.png)
Kamino for IrisClusters
If you are in the business of building a robust High Availability, Disaster Recovery or Stamping multiple environments rapidly and in a consistent manner Karmada may just be the engine powering your Cloning Facility..png)
I lost the clone war with KubeAdmiral but won the pod race with Karmada and would like to pay it forward with what I figured out. This is a mult-cluster solution, that I would consider to be a day zero with day one management of Kubernetes objects, IrisCluster included.
To keep inline with Cloud Native Computing Foundation standards, the Star Wars analogy is required, so here it goes.
.png)
Boba Fett's genetics were sent and prepared on Kamino, which triggered numberous clones were subsequently deployed across the galaxy. Some went to Endor, some went to Tatooine, others got deployed on the Death Star, and some even defected and bought a Ford F-150 and moved to Montana. But in all cases, the Clone essentially evolved on its own, but retained the base genetic footprint. This is somewhat the idea for Karmada, deploying resources to meet HA/DR, stretched, or purposeful environments with a single decleration of what the IRis
If you are looking for a more plausible use case for understanding Karmada, or generally fell out of favor of Disney's acquisition of the Star Wars franchise, here is one to take to a meeting, Multi-Cluster Secrets Management.
So if you are a Kubehead (tm) and tend to do this on the regular to sync secrets across clusters...
kubectl --context source get secret shhhh-secret -o yaml | kubectl --context target apply -f -You may want to look a this from just that angle as a simple, yet powerful backdrop.
Goal
Lets provision a pair of clusters, configure Karmada on one of them and join the second one to the Karmada control plane for the PUSH model. Once the second cluster is joined, we are going to provision an IrisCluster on the Karmada control plane, and propogate it to the member cluster.
Then, lets had a third cluster to Karmada and deploy the same IrisCluster to that one.
Clusters
Create a pair of clusters in Kind, one named Fett and the other Clone, this sill also install the Cilium CNI:
cat <<EOF | kind create cluster --name ikofett --config=-
kind: Cluster
apiVersion: kind.x-k8s.io/v1alpha4
nodes:
  - role: control-plane
  - role: worker
networking:
  disableDefaultCNI: true
EOF

cat <<EOF | kind create cluster --name ikoclone --config=-
kind: Cluster
apiVersion: kind.x-k8s.io/v1alpha4
nodes:
  - role: control-plane
  - role: worker
networking:
  disableDefaultCNI: true
EOF

kind get kubeconfig --name ikoclone > ikoclone.kubeconfig
kind get kubeconfig --name ikofett > ikofett.kubeconfig

KUBECONFIGS=("ikoclone.kubeconfig" "ikofett.kubeconfig")

for cfg in "${KUBECONFIGS[@]}"; do
  echo ">>> Running against kubeconfig: $cfg"
  cilium install --version v1.18.0 --kubeconfig "$cfg"
  cilium status --wait --kubeconfig "$cfg"
  echo ">>> Finished $cfg"
  echo
done
You should now have a pair of clusters and a pair of kubeconfigs.
.png)
IKO
IrisCluster is a CRD and IKO efficiently creates them, its important to ensure that IKO exists along with the CRDS on all clusters.
KUBECONFIGS=("ikoclone.kubeconfig" "ikofett.kubeconfig")

for cfg in "${KUBECONFIGS[@]}"; do
  echo ">>> Running against kubeconfig: $cfg"
  helm install iko iris-operator/ -f iris-operator/values.yaml --kubeconfig "$cfg"
  echo ">>> Finished $cfg"
  echo
done
Now, from a previous post we just so happen to have a stretched cluster laying around, so we will use that towards the end.
Karmada
Installing Karmada via Helm Chart is the easiest route with a fresh Kind cluster, so lets do that on `ikofett`
helm repo add karmada-charts https://raw.githubusercontent.com/karmada-io/karmada/master/charts
helm repo update
helm --namespace karmada-system upgrade -i karmada karmada-charts/karmada --version=1.15 --create-namespace --kubeconfig ikofett.kubeconfig
❗ The next step is pretty important, and a cornerstone to understanding cluster interaction.
We now need to create the kubeconfig to interact with the karmada cluster api..png)
You should now have 3 kubeconfigs... you will be interacting with the newly generated one often.
Here is an illustration of cluster api interaction at this stage of the distraction:.png)
Now that we have the Karmada control plane setup, lets just install the IKO crds into it. Instead of installing the entire operator, just add the crds from another machine into that control plane.
kubectl --kubeconfig ikofett.kubeconfig get crd irisclusters.intersystems.com -o yaml > ikocrds.yaml
kubectl create -f ikocrds.yaml --kubeconfig ikokamino.kubeconfig.png)
We should have Karmada ready for business, lets propogate an IrisCluster.
Join
Now we have to let Karmada know about and be able to "talk" to the member cluster, in our case, `ikoclone` of which we created in Kind.
sween @ fhirwatch-pop-os ~/Desktop/IKOPLUS/karmada
└─ $ ▶ kubectl karmada --kubeconfig ikokamino.kubeconfig  join ikoclone --cluster-kubeconfig=ikoclone.kubeconfig
cluster(ikoclone) is joined successfully
Propogate
Now we are going to do the two-step to deploy and propogate our IrisCluster, interacting only with the karmada api.
Step one
Deploy iriscluster to Karmada. This does NOT deploy an actual workload, it simply stores the definition, much like a "template" for an IrisCluster, or if we are still tracking to the Star Wars analagy, the DNA of the clone.
# full IKO documentation:
# https://docs.intersystems.com/irislatest/csp/docbook/Doc.View.cls?KEY=PAGE_deployment_iko
apiVersion: intersystems.com/v1alpha1
kind: IrisCluster
metadata:
  name: federated-iris
spec:
  topology:
    data:
      image: containers.intersystems.com/intersystems/iris-community:2025.1
  serviceTemplate:
    spec:
      type: LoadBalancer
      externalTrafficPolicy: Local
You can query irisclusters in the karmada control plane, but you will notice its basically just a stub.
.png)
Step two
Deploy a propogation policy to send it.
apiVersion: policy.karmada.io/v1alpha1
kind: PropagationPolicy
metadata:
  name: iriscluster-propagate
  namespace: default
spec:
  resourceSelectors:
  - apiVersion: intersystems.com/v1alpha1
    kind: IrisCluster
  placement:
    clusterAffinity:
      clusterNames:
      - ikoclone    #### our clone or member cluster
On the clone you should see a spun up IrisCluster!
.png)
Join Another and Propogate Another
Revisit the additional kubeconfig for brevity..png)
Now in one full swoop, lets join a stretched cluster out on Google Cloud Platform from a previous post with a similar join.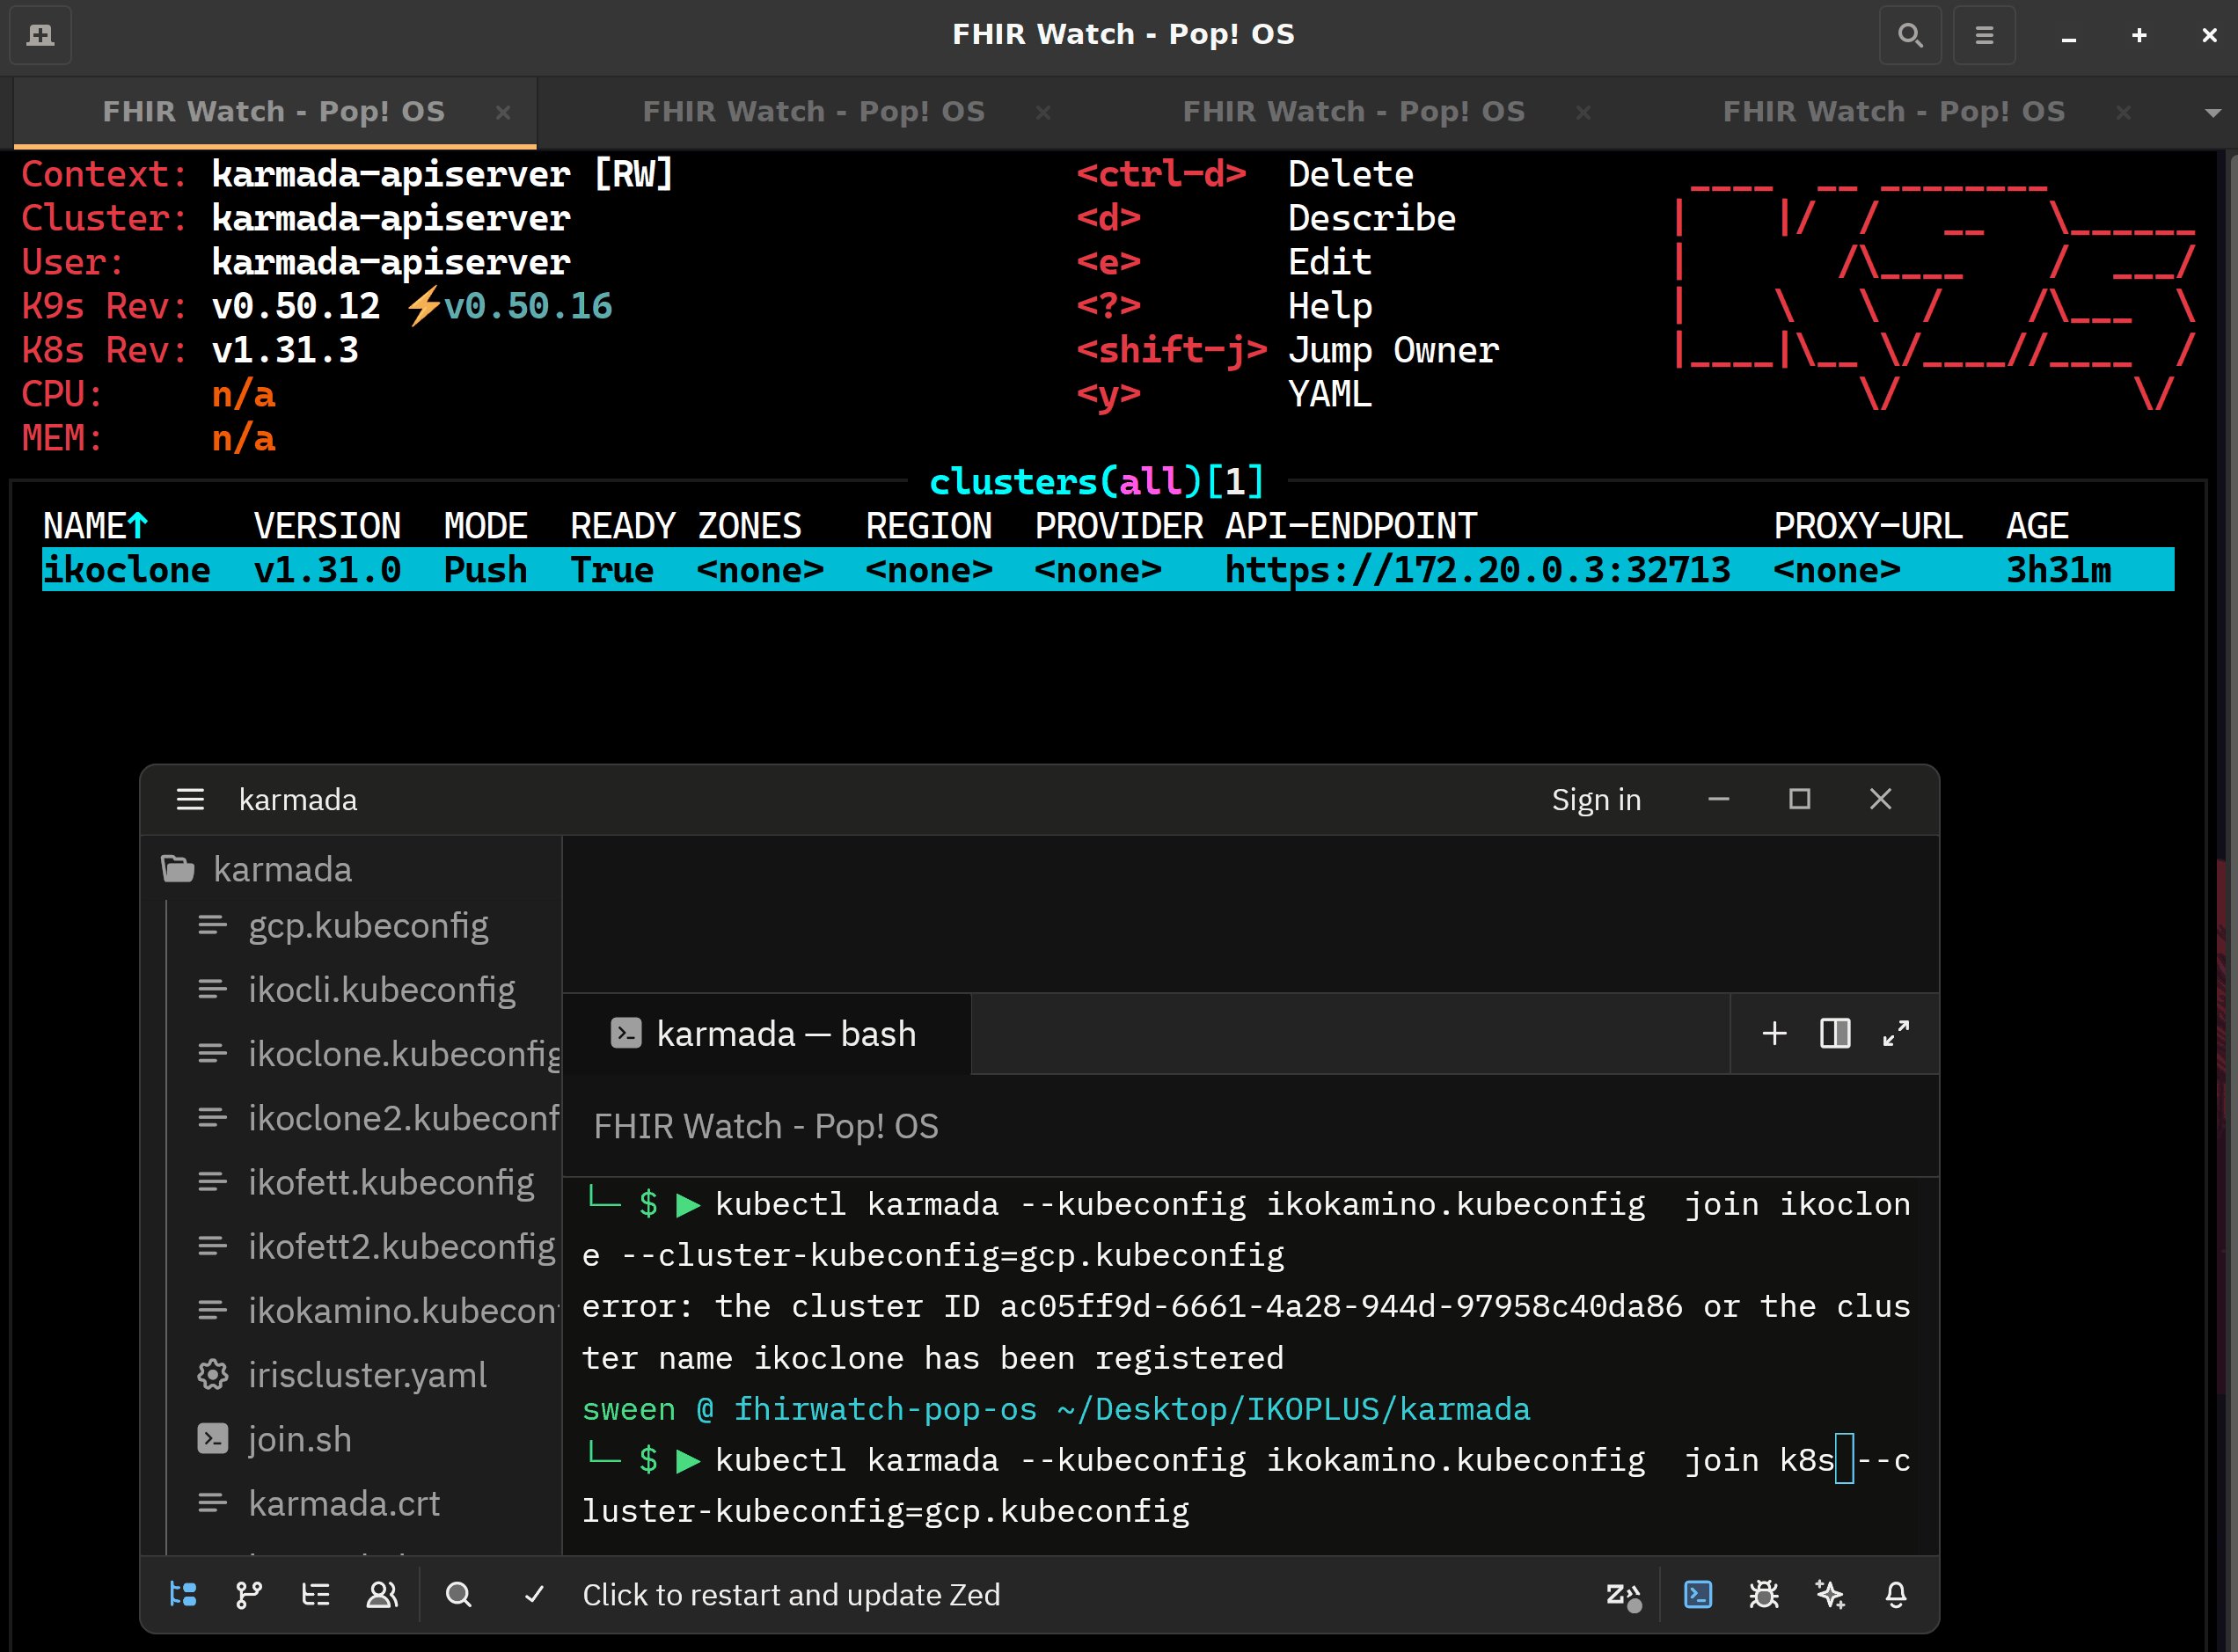
The second cluster is now available for business out in Google Cloud Platform as a Stretched Cluster..png)
To get a IrisCluster out there, we just have to edit our propogation policy to include the new target `k8s`.
.png)
And there you have it, another clone of the IrisCluster out on GCP.png)
This scratches the surface with Karmada, check the docs for professional flexibility with your clones:
- overrides on resources per joined cluster
- networking integration with submariner
- governance guidance
- PUSH configuration, a lot like ArgoCD (PULL was above)
- ...
- ...


(1).png)
 Open Exchange